Sage ribbon quilt: floral diamonds from three simple triangles (42 × 54-inch lap quilt)
🖨️ Prefer to sew from paper? Printable PDF patterns are in our Etsy shop ↗
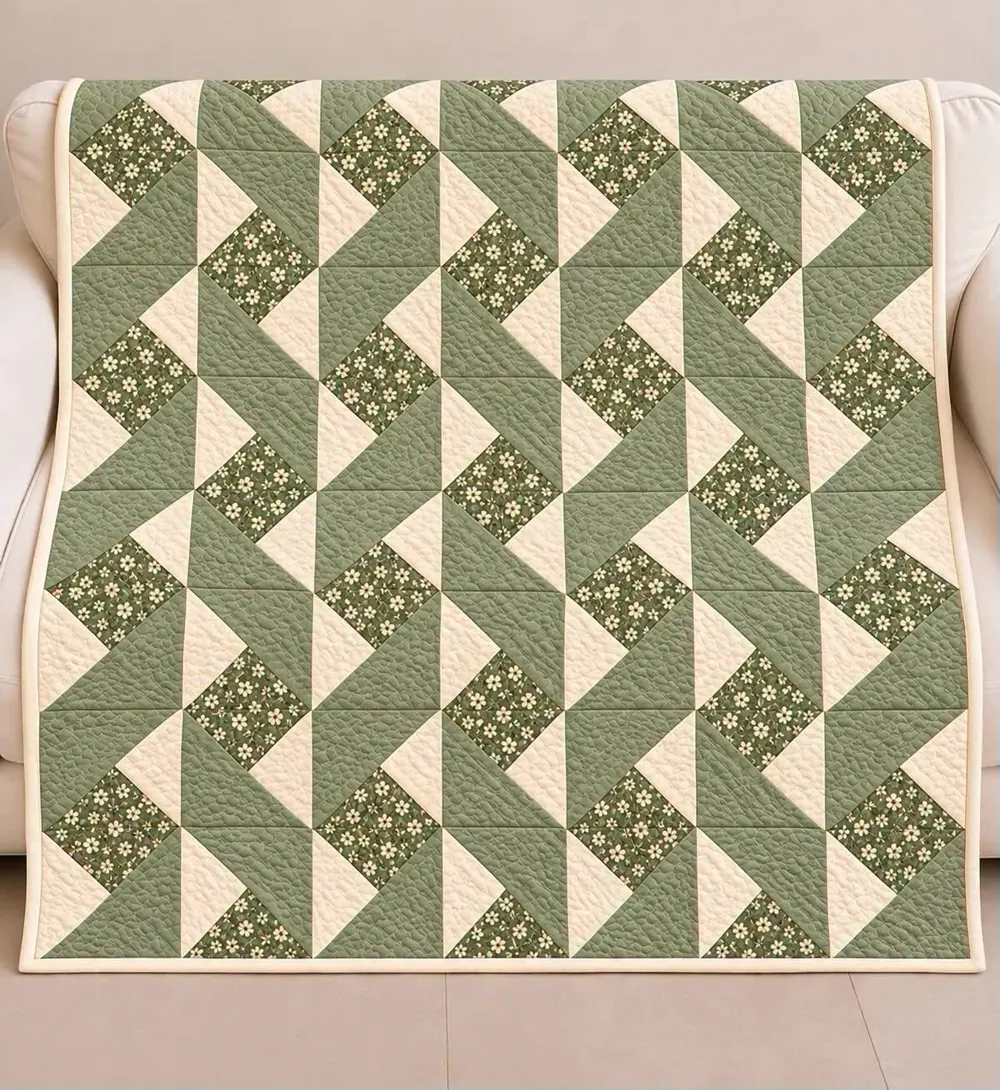
A green and cream lap quilt where floral diamonds appear between twisting ribbons. Only three triangles, two mirror-image squares and a finished size of 42 × 54 inches.
Complete guide · No signup required
A quilt that looks harder than it is
Look closely at this quilt and you will see green ribbons twisting across it, cream triangles pointing every which way and little floral diamonds in between. It looks complicated, but every square is made of the same three triangles.
The diamonds are not cut as diamonds at all. Each one is two floral triangles from two squares that meet when you put the quilt together.
Quilt size and what it is made of
All measurements include a ¼-inch seam allowance unless they say finished.
| Part | Size | How many |
|---|---|---|
| Quilt | 42 × 54 in finished | 1 |
| Squares | 6 in finished (6½ in before sewing) | 63 |
| Square A (floral on top) | 6½ in | 36 |
| Square B (floral on the bottom) | 6½ in | 27 |
Fabric and supplies
A solid or tone-on-tone sage, a soft cream and a darker green floral give the clearest pattern.
- Sage green: 1¼ yards
- Green floral: 1 yard
- Cream: 1½ yards (including binding)
- Backing: 3 yards
- Batting: 50 × 62 inches
Step 1: Cut the triangles
Sage: cut 6 strips 6⅞ inches wide and cut 32 squares 6⅞ inches (6 per strip; you need at least 41¼ inches of usable width). Cut each square once, corner to corner: 64 big triangles.
Floral: cut 4 strips 7¼ inches wide and cut 16 squares. Cut each square twice, corner to corner both ways: 64 small triangles. Cream: the same, 16 squares 7¼ inches cut twice.
Step 2: Make 36 of square A and 27 of square B
Square A: lay a cream triangle with its long edge on the left and put a floral triangle above it. Sew them together along the short edge they share and press toward the floral. Sew this pair to a big sage triangle along the long diagonal.
Square B is the mirror image: the floral goes below the cream. Press and check that every square measures 6½ inches.
Step 3: Lay out the squares
Lay out 7 columns of 9 squares. Columns 1, 3, 5 and 7 use square A, columns 2, 4 and 6 use square B. In every column, turn the 2nd, 4th, 6th and 8th square half a turn.
Step back and look: the floral triangles meet in diamonds and the sage turns into ribbons. If a diamond is missing, one square is turned the wrong way.
Step 4: Sew the rows
Sew the squares in each row together, pinning where the points meet. Press the seams of odd rows to the right and even rows to the left, then join the rows. The top measures 42½ × 54½ inches.
Step 5: Quilt and bind
Cut the backing into two 50-inch pieces and sew them together. Layer, baste and quilt: an all-over pebble or meander, like in the photo, hides the many seams.
Cut 6 cream binding strips 2½ inches wide, join them and bind.
Fixing common problems
Triangles reward patience.
- Squares smaller than 6½ inches: the bias seam stretched. Press, do not iron, and use a little starch before cutting.
- Floral diamonds do not line up: pin exactly where the floral points meet before sewing the rows.
- Wrong turn: check the layout photo on your phone before you sew each row.
- Points cut off at the edge: that is normal on the outside edges; the binding covers them.
Final thoughts
Try it in blue and white, or with a red floral for Christmas: the same squares make the same ribbons in any colors. Want more cozy projects with every measurement worked out? Our printable PDF patterns are waiting in our Etsy shop, and our free guides are always here.