Scrappy bricks and squares quilt: an easy step-by-step tutorial for a 48 × 60-inch lap quilt
A relaxing beginner quilt made from only three shapes: cream squares, print rectangles and a few end pieces. Clear cutting charts, two simple row recipes and no seams to match.
Complete guide · No signup required
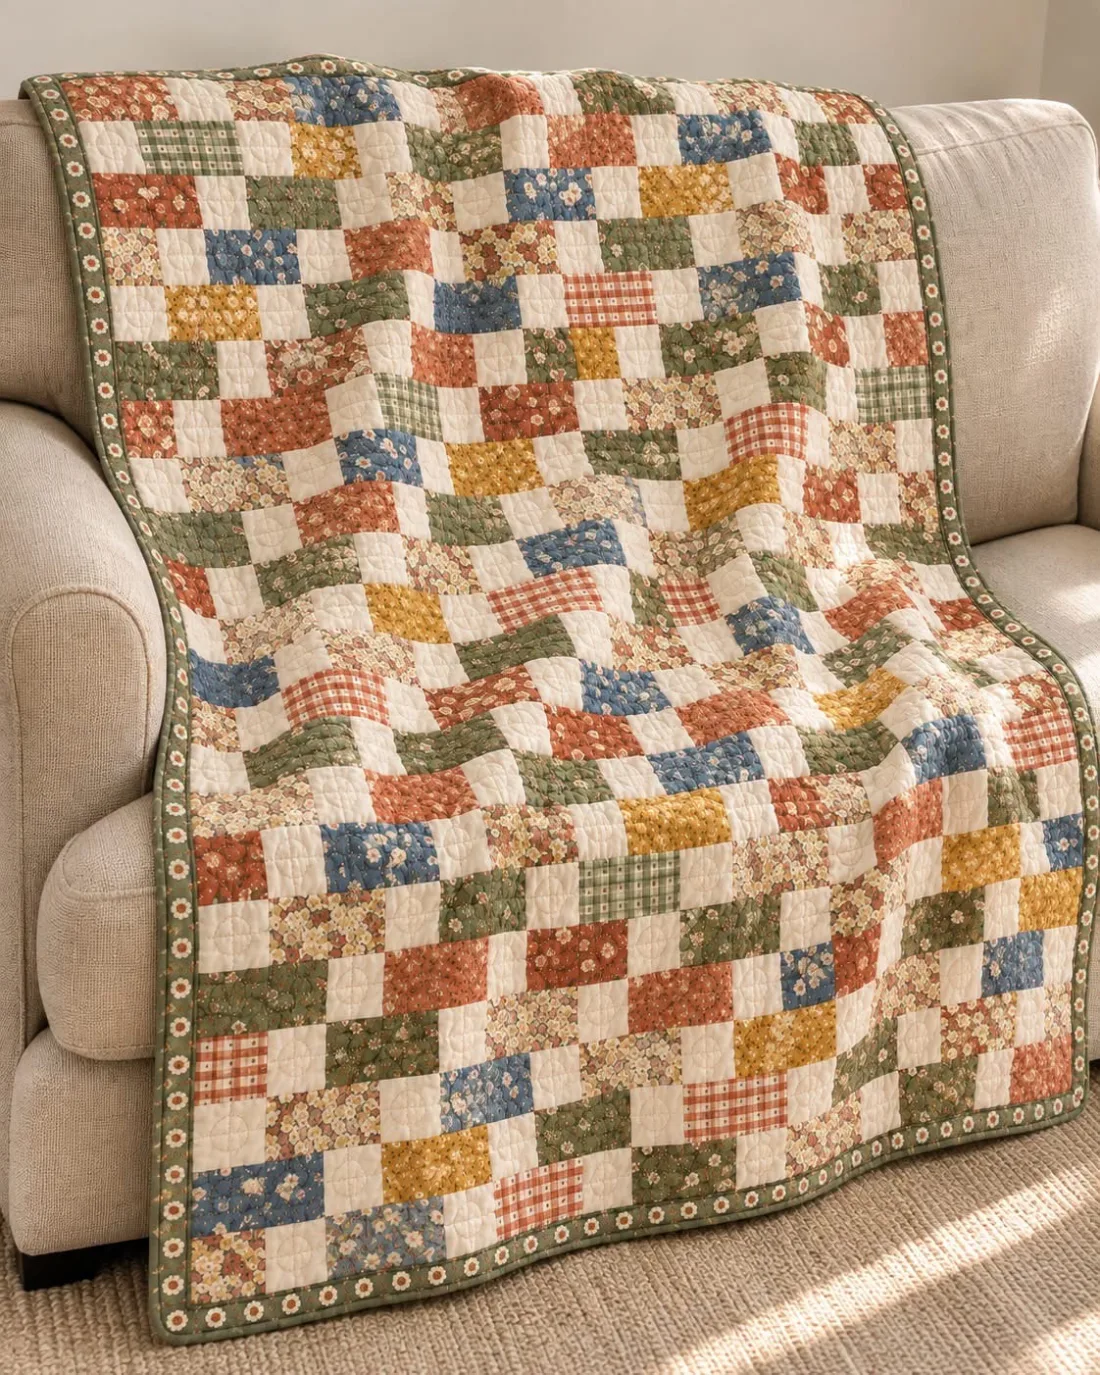
A cheerful quilt that is kind to beginners
Some quilts look busy and complicated, but are really very gentle to make. This is one of them. Look closely at the photo above: the whole quilt is made of print rectangles with a small cream square between them. Every other row is shifted a little to the side, and that shift is what makes the cream squares dance across the quilt like stepping stones.
There are no triangles, no points to match and no blocks to square up. You sew straight seams, one row at a time. Even better, because every other row is shifted, the seams of one row never have to meet the seams of the next. That is the part of patchwork that worries many quilters, and here you simply skip it.
It is also a wonderful scrap quilt. Reds, greens, blues, mustard yellows, little checks and small florals all live happily together, because the cream squares give the eye a place to rest. If you have a drawer of fat quarters waiting for the right project, this is it.
Before you start: a few words explained
If you are new to quilting, these terms appear in this tutorial. Come back to this list whenever you need it.
- Seam allowance: the fabric between your stitching and the edge. In quilting it is always ¼ inch. All the cutting sizes below already include it, so you never have to add it yourself.
- Cut size and finished size: a cream square is cut 3½ inches, but once it is sewn on all sides you only see 3 inches. Both numbers are correct; they describe different moments.
- Fat quarter: a precut piece of fabric about 18 × 21 inches, sold in most quilt shops.
- WOF (width of fabric): a strip cut from one folded edge of the fabric to the other, about 40 to 42 inches long.
- Chain piecing: sewing pairs one after another without lifting the presser foot or cutting the thread, then snipping them apart. It saves a lot of time and thread.
- Pressing: setting a seam with the iron by lifting and lowering it, not sliding it back and forth like ironing a shirt.
Quilt size and what it is made of
The quilt finishes at 48 × 60 inches, a generous lap or sofa size. It is built from twenty rows, each 3 inches tall once sewn. There are only two kinds of row, which we call row A and row B, and they simply take turns.
| Part | How many | Cut size |
|---|---|---|
| Cream squares | 110 | 3½ × 3½ in |
| Print rectangles (bricks) | 90 | 6½ × 3½ in |
| Print end pieces | 20 | 5 × 3½ in |
| Rows | 20 (10 of A, 10 of B) | each 48½ × 3½ in |
| Quilt top | 1 | 48½ × 60½ in before binding |
Fabric and supplies
These amounts assume fabric about 42 inches wide with at least 40 usable inches, and fat quarters of about 18 × 21 inches. A little extra is included so a cutting mistake is not a disaster.
- Cream background: 1¼ yards
- Prints: 8 to 10 fat quarters in mixed colors (7 are enough by the numbers; extra prints give more variety)
- Binding: ½ yard (a small print or stripe looks lovely, like the flowered green binding in the photo)
- Backing: 4 yards, and batting about 56 × 68 inches
- Rotary cutter, cutting mat and a ruler at least 6½ inches wide
- Neutral thread (cream or light gray), pins or clips, iron, sewing machine with a ¼-inch foot if you have one
- Paper and a pencil to make little row labels
Step 1: Cut the cream squares
Straighten one edge of the cream fabric. Cut ten strips, each 3½ inches wide, across the width of the fabric. Then cut each strip into 3½-inch squares. One strip gives eleven squares, so ten strips give the 110 squares you need.
Stack the squares in piles of ten. Counting in tens is much easier than counting 110 loose squares, and you will see at a glance if a pile is short.
Step 2: Cut the print rectangles and end pieces
From each fat quarter, cut 3½-inch strips along the 21-inch side. You get five strips from one fat quarter. From each strip, cut three rectangles 6½ inches long. One fat quarter therefore gives 15 rectangles, and six fat quarters give the 90 you need.
For the 20 end pieces, cut 3½-inch strips from one more fat quarter and cut them into 5-inch lengths. Each strip gives four end pieces, so five strips give twenty. If you have extra fat quarters, mix them in: cut a few rectangles from each so the colors spread across the quilt.
Step 3: Sew 90 square-and-rectangle pairs
Place a cream square on the left end of a print rectangle, right sides together, edges even. Sew along the 3½-inch edge with a ¼-inch seam. Without cutting the thread, feed in the next pair, then the next. When you have a long chain, snip the pairs apart.
Press each seam toward the print rectangle. Dark seams hidden under the print stay invisible; seams pressed under the cream can show through as a shadow. Each pair now measures 9½ × 3½ inches. You need 90 pairs in total, one for every rectangle.
- Sew ten pairs and measure one before continuing. It should be 9½ inches long.
- If it is shorter, your seam is a little too wide; if it is longer, a little too narrow. Adjust and try again.
- Take a break every thirty minutes or so. Your shoulders and eyes will thank you, and accuracy stays better.
Step 4: Make ten of row A
Row A begins and ends with cream. Sew five pairs together end to end, always with the cream square on the left. Then sew one extra cream square to the right end of the row. Press all seams toward the prints.
| Row A, from left to right | Pieces |
|---|---|
| Five pairs | cream · print · cream · print · cream · print · cream · print · cream · print |
| Then | one cream square at the right end |
| Check | row measures 48½ × 3½ in |
Step 5: Make ten of row B
Row B begins and ends with a print end piece. Sew one end piece to the left of four pairs. Sew one cream square after the last pair, and then the second end piece at the right end. Press all seams toward the prints.
| Row B, from left to right | Pieces |
|---|---|
| Start | one print end piece (5 in) |
| Then | four pairs (cream · print, four times) |
| Then | one cream square |
| End | one print end piece (5 in) |
| Check | row measures 48½ × 3½ in |
Step 6: Lay out and join the rows
On a bed or a clean floor, lay the rows out from top to bottom: A, B, A, B, and so on, twenty rows in all. Step back and look. If two similar prints sit next to each other, swap a row end for end, or swap it with another row of the same letter.
To join two rows, place them right sides together and pin at both ends, in the middle, and every four or five inches between. Because the seams of row A and row B never meet, you do not have to match anything; just keep the long edges even. Sew with a ¼-inch seam.
Join the rows in pairs first, then join the pairs, then the larger sections. Long seams are easier to handle when the pieces are shorter. Press the long seams open or toward the row below; either is fine for this quilt.
Step 7: Check the quilt top
Lay the finished top flat and measure through the middle in both directions. It should be about 48½ × 60½ inches. A difference of up to ½ inch is normal with twenty rows; much more than that usually means one row is longer than the others, so measure the rows.
Step 8: Quilt and bind
Layer the backing (right side down), the batting and the quilt top (right side up), and smooth each layer. Pin or baste every few inches. A simple loop or a gentle meander, like the soft quilting in the photo, keeps the quilt cuddly; straight lines with a walking foot are just as nice.
For the binding you need about 228 inches: the 216-inch outside edge plus 12 inches for joining and corners. Cut six strips 2½ inches wide across the width of the fabric, join them end to end, press in half lengthwise and sew to the quilt edge.
Fixing common problems
Every quilter meets these sooner or later. None of them means you did anything wrong; they just need a small adjustment.
- Rows are different lengths: one or two seams were wider than ¼ inch. Measure the pairs in the long row and resew the one that is off.
- Rows wave when joined: the long seam was stretched. Pin more often and let the machine pull the fabric instead of pushing it.
- Shadows under the cream: a seam was pressed toward the cream. Re-press it toward the print.
- Two identical prints touching: turn a row end for end before you sew it to its neighbor.
Questions quilters often ask
Can I make it bigger? Yes. Each extra pair of rows (one A and one B) adds 6 inches of length. To add width, add one more pair to each row: that adds 9 inches.
Can I use 2½-inch precut strips? This plan is built on 3½-inch strips. You can use 2½-inch strips by cutting 2½-inch squares, 4½-inch rectangles and 3½-inch end pieces; the quilt will then finish at 32 × 40 inches.
Do the end pieces have to be the same print? No. Use any print; scrappy end pieces make the edges look as lively as the middle.
Final thoughts
This quilt is proof that simple shapes and a steady ¼-inch seam can make something truly beautiful. Cut carefully, count in tens, label your rows and take your time; there is no rush. Before you know it, you will have a cozy quilt for the sofa or a lovely gift for someone you love. Follow Cozy Pattern Lane on Facebook and Instagram (@cozypatternlane) for more easy quilting ideas.