Trip Around the World quilt: 357 squares, eight fabrics and rings of color (51 × 63 inches)
🖨️ Prefer to sew from paper? Printable PDF patterns are in our Etsy shop ↗
A classic Trip Around the World quilt made only of 3-inch squares. Eight fabrics, rings that grow from one center square and a finished size of 51 × 63 inches.
Complete guide · No signup required
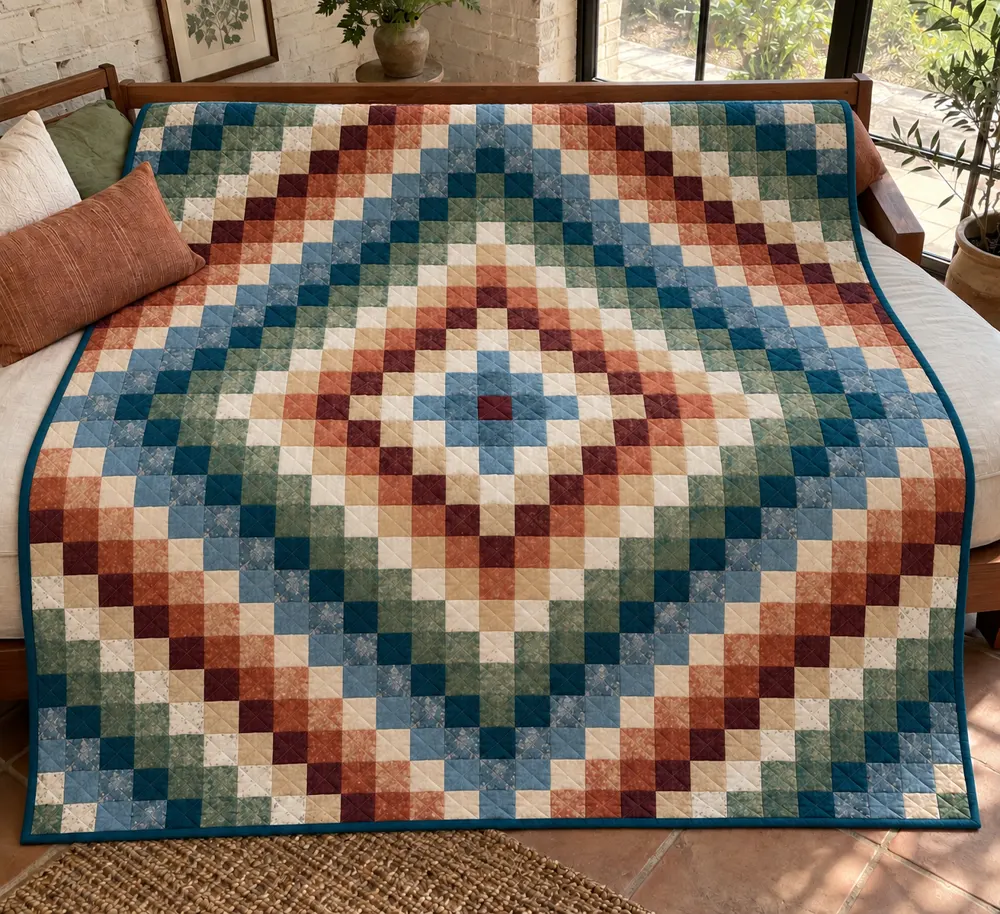
Rings of color from one little square
Everything in this quilt starts with one square in the middle. Around it goes a ring of the second fabric, then a ring of the third, and so on until the rings reach the edges. Rust, blues, cream and greens make it feel warm and calm at the same time.
There are no triangles at all. If you can sew two squares together with a straight seam, you can make this quilt. The only thing to watch is the order of the colors, and we will show you an easy way to keep it.
Quilt size and what it is made of
All measurements are in inches and include a ¼-inch seam allowance unless they say finished.
| Part | Size | How many |
|---|---|---|
| Finished quilt | 51 × 63 in | 1 |
| Squares | 3½ in (3 in finished) | 357 |
| Rows | 17 squares each | 21 |
| Fabrics | 8, about 45 squares each | 8 |
Fabric and supplies
Choose eight fabrics that step from dark to light and back again, so each ring stands out from the one next to it.
- 8 fabrics: ½ yard each (4 strips of 3½ inches from each)
- Binding: ½ yard (a deep blue or teal looks lovely)
- Backing: 3½ yards
- Batting: 59 × 71 inches
- Neutral thread, rotary cutter, ruler and mat
Step 1: Number your fabrics
Lay the eight fabrics in a line and give each one a number from 1 to 8. Fabric 1 is the very center of the quilt. Pin a little paper label to each pile so you never have to guess.
Step 2: Cut the squares
Cut 4 strips 3½ inches × the width of the fabric from every fabric. Cut each strip into 12 squares 3½ inches. You will have 48 squares of each fabric, a few more than you need.
| Fabric | Squares needed |
|---|---|
| 1 (center) | 45 |
| 2 | 46 |
| 3 | 46 |
| 4 to 8 | 44 each |
Step 3: Lay out the center row
The center row is row 11 (counting from the top). Its middle square is fabric 1. Going out to the left and to the right, the numbers count up: 2, 3, 4, 5, 6, 7, 8, then 1 again. The row has 17 squares, so you go 8 squares to each side of the middle.
Step 4: Lay out every other row
Each row is the row next to it moved by one ring. The row just above and the row just below the center start with the next number at their middle square (fabric 2), and every square is one number higher than the square right next to it toward the center row.
The easiest way is to lay the whole quilt out on a floor or a design wall before sewing, and take a photo with your phone. If one square breaks a ring, you will see it right away.
Step 5: Sew the rows and join them
Sew the 17 squares of each row together. Press the seams of odd rows to the right and even rows to the left, so the seams lock when you join the rows.
Join the rows in order, pinning at every seam. The top measures 51½ × 63½ inches.
Step 6: Quilt and bind
Cut the backing into two pieces 59 inches long and sew them together along a long edge. Layer the backing, batting and top, and baste. Straight lines through the rows or a soft all-over meander both suit this quilt.
Cut 7 binding strips 2½ inches wide, join them into one long strip and bind the quilt with mitered corners.
Fixing common problems
A few small checks keep the rings neat.
- A ring breaks: one square is in the wrong place. Compare with your phone photo before sewing the row.
- Corners do not meet: press odd and even rows in opposite directions and pin at every seam.
- Rows of different lengths: each row should measure 51½ inches; adjust the seam if it does not.
- Rings blend together: put a light fabric between two darker ones.
Final thoughts
Try it in reds and greens for Christmas or in pastels for a baby: the same 357 squares make the same rings. Want more cozy projects with every measurement worked out? Our printable PDF patterns are waiting in our Etsy shop, and our free guides are always here.