Project overview
- Skill level
- Intermediate · US terminology
- Finished size
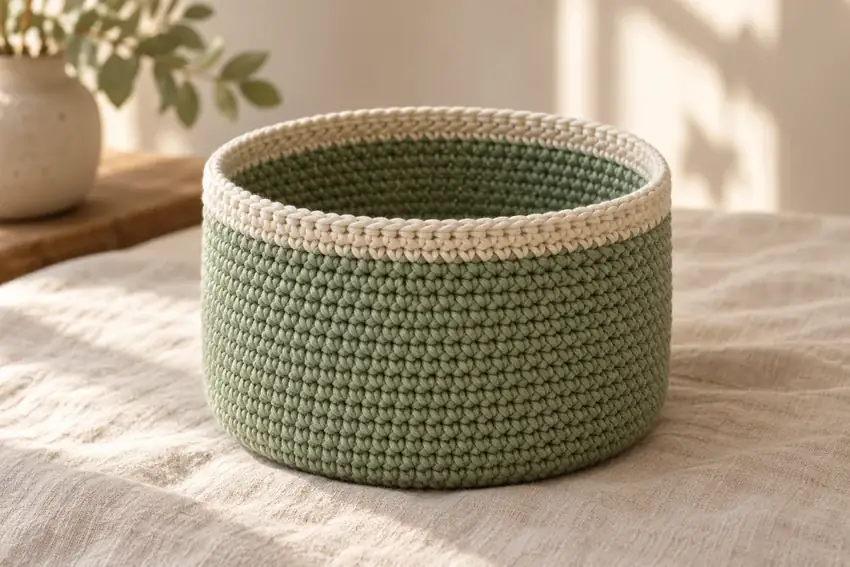
- At target stitch gauge, 60 stitches give approximately 20 in (50.8 cm) around, or 6.4 in (16.2 cm) in diameter. Fifteen wall rounds at target row gauge give about 5 in (12.7 cm) height. Base shape and firmness require physical testing.
- Gauge
- Target: 12 sc and 12 rows = 4 in (10.16 cm) in firm, unstretched fabric. Wall gauge is measured in the round. Calculations: circumference 60 ÷ 3 = 20 in; approximate diameter 20 ÷ π = 6.37 in; wall height 15 ÷ 3 = 5 in. No made sample has verified these targets.
- Testing status
- Written draft — maker testing pending
Materials & tools
- Bulky category 5 cotton or a firm cotton-rich yarn suitable for baskets. Plan about 180 yd (165 m) sage and 40 yd (37 m) ivory including sampling; these are unmeasured estimates. Avoid stretchy yarn if you want a firmer wall.
- A 5.5 mm hook as a trial size, or a hook that gives firm fabric at the target gauge without painful tension.
- A removable round marker, blunt yarn needle, scissors and measuring tape. No handles, stiffener or lining are included in this pattern.
Abbreviations & stitch notes
- US terminology: ch = chain; sc = single crochet; st / sts = stitch / stitches; inc = work 2 sc in the same stitch; BLO = back loop only.
- Rounds are continuous: do not join with a slip stitch or make a starting chain between rounds. Mark the first actual sc of each round and move the marker as you reach it.
- Except round 11, insert under both top loops. In round 11 only, insert under the loop farther from you as you view the next stitch in working position.
For a refresher, use our chain and single crochet lesson, double crochet lesson, or US / UK terminology referenceCalculate stitches from your gauge →.
Let's make it, step by step.
Read the full pattern once before starting. Optional checkboxes help you follow the sequence for this page view only.
- 6 sc
With sage, form an adjustable ring: wrap yarn around a finger once, draw a working loop through that ring and ch 1 to secure it; this chain does not count. Make 6 sc into the ring opening, mark the first sc, and pull the starting tail gently to close the center. Keep working without joining or turning.
- 12 sc
Work 2 sc in each of the 6 stitches. Move the marker into the first completed sc of this new round.
- 18, 24, then 30 sc
Round 3: repeat (sc in next st, inc in next st) 6 times = 18 sc. Round 4: repeat (sc in next 2 sts, inc in next st) 6 times = 24 sc. Round 5: repeat (sc in next 3 sts, inc in next st) 6 times = 30 sc. Keep every increase in one old stitch, not in a gap.
- 36, 42, then 48 sc
Round 6: repeat (sc in next 4 sts, inc in next st) 6 times = 36 sc. Round 7: repeat (sc in next 5 sts, inc in next st) 6 times = 42 sc. Round 8: repeat (sc in next 6 sts, inc in next st) 6 times = 48 sc. Place the piece on a table and inspect it before continuing.
- 54, then 60 sc
Round 9: repeat (sc in next 7 sts, inc in next st) 6 times = 54 sc. Round 10: repeat (sc in next 8 sts, inc in next st) 6 times = 60 sc. The base now has ten rounds. Count 60 sc before starting the wall.
- 60 sc BLO; first wall round
Work 1 sc BLO in every stitch, without any increases. This is the only BLO round. Keep the round continuous and move the marker to its first sc.
- 60 sc per round; 12 wall rounds so far
Return to both top loops. Work 1 sc in each stitch for eleven more rounds, always keeping 60 sc. There are no increases or decreases. After round 22, you have twelve wall rounds including round 11. On the final sc of round 22, draw ivory through the last two loops to change color. Leave both tails for weaving.
- 3 ivory rounds; 15 wall rounds total
Work 1 sc under both top loops of every stitch for three complete rounds in ivory. Keep 60 sc each round; this rim has no increase, fold or extra edging. Stop after the last sc of round 25 and cut a usable tail. Draw the tail through the live loop.
- 25 total rounds; 10 base + 15 wall
Weave every tail securely through neighboring stitch backs, changing direction without gathering the fabric. Secure the adjustable-ring tail particularly carefully; a pulled ring alone is not a permanent finish. The continuous-round finish leaves a small step at the color change and rim. Shape by hand and use only the washing or blocking method allowed by the yarn label. Check the actual diameter, wall height and stability before filling.
Construction, finishing & helpful notes
Understand the six-increase base
Each base round adds exactly six stitches: round r has 6r sc through round 10. The plain stitches before each increase rise from one in round 3 to eight in round 10. Work all six repeats, then stop at the marker.
The aligned increases can leave a softly hexagonal outline. This is a construction characteristic of this written sequence, not an instruction to pull six corners into a perfect circle.
The back-loop hinge is only one round
Round 11 retains all sixty stitches while leaving the front loops visible around the base edge. It helps distinguish the base from the wall; it does not itself guarantee a rigid upright basket.
Rounds 12–25 return to both loops. Repeating BLO accidentally would produce extra ridges and change the wall fabric shown by this design.
Check flatness before committing to the walls
If the base ruffles, confirm there are exactly six increases in each base round. If it cups, confirm none were missed. When counts are correct, yarn and hook choice can still change flatness and firmness; try a new sample instead of forcing it into shape.
A loose wall may slump. A tighter workable gauge or a firmer yarn can help, but either change can alter the finished measurements. Do not add unlisted increases to solve a tension issue.
Color changes and the round marker
The last pull-through of round 22 introduces ivory, so the first full stitch of round 23 is ivory. Keep the marker on that first actual stitch; do not mistake the color-change tail for the start of a new round.
A continuous spiral creates a visible small step where colors change. This pattern accepts that step rather than promising an invisible join.
Use it as a small storage piece
Try the basket for yarn notions, folded cloths or other light household items. It has no handle or tested load rating; support the base when moving it. Keep sharp tools in a separate protective case.
Follow the yarn label for washing and reshape gently while drying if appropriate. Record the actual usable opening and stability of your made sample before making a larger version.
Video help for the techniques
These external tutorials explain stitches or finishing used in this recipe. Follow this page for the project's exact counts, placement and assembly.
How to Single Crochet (SC) — Yarnspirations / Red Heart Design Team ↗Weave In Ends in Crochet — Yarnspirations ↗Browse all technique references →Explore the Beyond the Basics collection →
Keep your next make a little easier.
Save yarn, hook, gauge and measurement notes using our free starter checklist.
Open the free checklist ↗