Harvest Lane
Rail Fence Quilt
🖨️ Prefer to sew from paper? Printable PDF patterns are in our Etsy shop ↗
Vintage florals, little checks and a warm cream frame. Piece twelve simple blocks into a cozy throw with a cheerful square border.
- Finished design
- 48 × 60 in · 122 × 152 cm
- Skill level
- Confident beginner
- Piecing seam
- 1/4 in, included in cuts
Complete pattern. No email or purchase required.
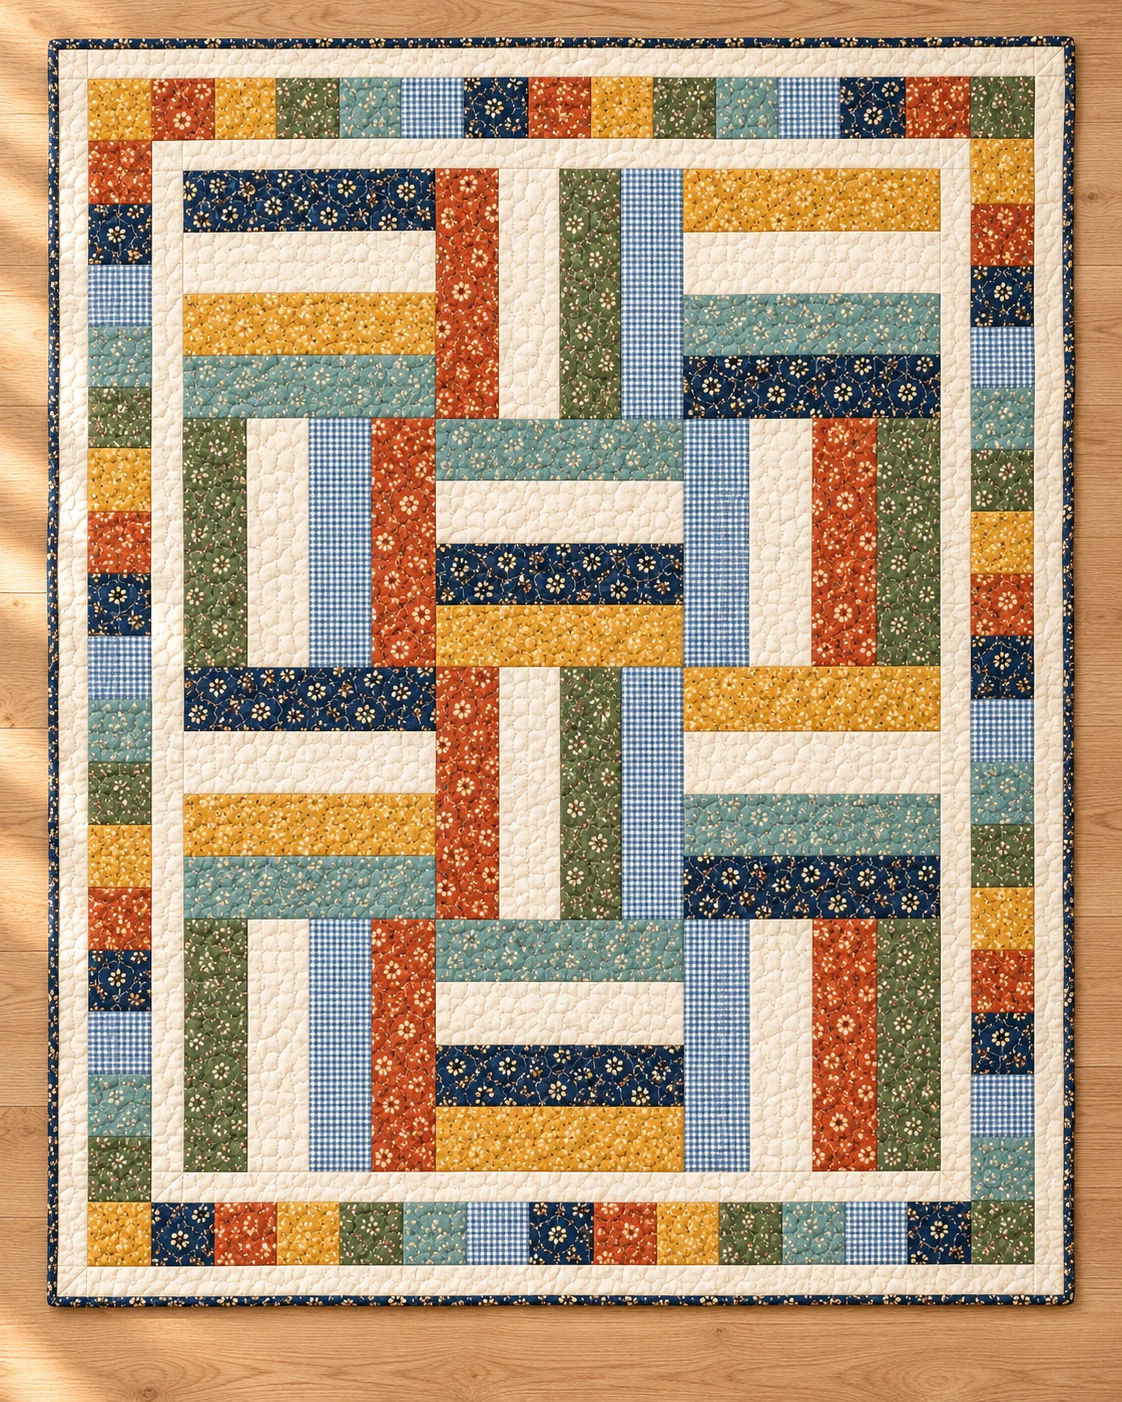
Cutting math and diagrams reviewed. This new layout uses traditional rail-fence blocks. No physical sample has been sewn. Make one test block before cutting all fabric. Fabric use and finished size may vary.
Fabric & supplies
- A Navy floral; B Rust floral; C Mustard floral: 1/2 yd EACH
- D Sage floral; E Muted teal floral; F Blue gingham: 1/2 yd EACH
- G Warm cream: blocks and both frames: 1 1/2 yd
- Separate navy binding fabric: 5/8 yd
- Backing, regular quilting cotton: 4 1/4 yd; piece as on page 9
- Batting: At least 56 x 68 in
Allowances assume at least 40 in usable width. You will also need a rotary cutter, ruler, mat, iron, sewing machine, thread and basting supplies.
Complete cutting list
Cut sizes include a 1/4-in seam allowance. WOF means usable width of fabric. Join cream frame strips end-to-end before cutting the long border lengths.
| Piece | Quantity | Cut size |
|---|---|---|
| Print rectangles A-F | 6 each / 36 total | 3 1/2 x 12 1/2 in |
| Cream G rectangles | 12 | 3 1/2 x 12 1/2 in |
| Border squares A-D | 11 each | 3 1/2 in square |
| Border squares E-F | 10 each | 3 1/2 in square |
| Inner cream sides | 2 | 2 x 48 1/2 in |
| Inner cream top/bottom | 2 | 2 x 39 1/2 in |
| Outer cream sides | 2 | 2 x 57 1/2 in |
| Outer cream top/bottom | 2 | 2 x 48 1/2 in |
| Binding | 7 WOF strips | 2 1/2 in wide |
Block order & center map
A navy floral · B rust floral · C mustard floral · D sage floral · E muted teal floral · F blue gingham · G warm cream.
H means horizontal rails: read the fabric order top to bottom. V means vertical rails: read left to right. Assemble all blocks horizontally first, then rotate V blocks 90 degrees counterclockwise.
| Row | Left block | Middle block | Right block |
|---|---|---|---|
| 1 | 1 H: A - G - C - E | 2 V: B - G - D - F | 3 H: C - G - E - A |
| 2 | 4 V: D - G - F - B | 5 H: E - G - A - C | 6 V: F - G - B - D |
| 3 | 7 H: A - G - C - E | 8 V: B - G - D - F | 9 H: C - G - E - A |
| 4 | 10 V: D - G - F - B | 11 H: E - G - A - C | 12 V: F - G - B - D |
Before you cut
Read the full pattern first. All cuts include a 1/4-in seam allowance. Finished dimensions describe the design inside the outer seam lines; quilting, binding and washing can change the final size.
Allowances assume at least 40 in usable width after removing selvages. Buy extra for shrinkage, one-way prints or fussy cutting. Press fabric before cutting; check the usable width.
Tools: rotary cutter, mat, quilting ruler, sewing machine, thread, iron, pins or clips, basting supplies and a walking foot. Keep each fabric labeled A through G.
Sew a test block before cutting all your fabric. All three joins in that block must be consistent. Press without stretching.
Cutting chart
WOF means usable width of fabric. For each print, cut three 3 1/2-in x WOF strips: subcut six long rectangles from two strips, then 10 or 11 squares from the third.
For cream, cut four 3 1/2-in x WOF strips for the 12 rectangles. Cut eleven 2-in x WOF strips for both frames. Join frame strips end-to-end with straight 1/4-in seams; press open, then cut the lengths above.
Measure through the center before cutting each border to final length. The chart assumes accurate blocks. Correct earlier errors instead of stretching a border to fit.
Make the rail-fence blocks
Each block uses four rectangles: three prints and one cream. Assemble every block with the strips horizontal first, in the order on page 5 (top to bottom).
1. Place strips 1 and 2 right sides together. Match their long edges and sew a 1/4-in seam. Add strip 3, then strip 4, using the same allowance.
2. Alternate the direction you sew each seam to help prevent bowing. Press seams open to reduce bulk where neighboring blocks meet. Let the block cool flat.
3. Check the block: 12 1/2 x 12 1/2 in unfinished. Width check: 4 x 3 1/2 minus 3 x 1/2 = 12 1/2 in. Do not trim an undersized block to hide a seam error.
4. Make blocks 1-12. Leave H blocks horizontal. Rotate V blocks 90 degrees counterclockwise; their original top-to-bottom strip order now reads left to right.
Join the center & inner frame
1. Lay out all blocks as on page 5. Sew three blocks into each of four rows with 1/4-in seams. Match the corners and pin; keep the cream rails in their mapped positions.
2. Each row should measure 36 1/2 x 12 1/2 in. Press the row seams open. Join rows 1-4, matching the block intersections. Press flat.
3. Check the center: 36 1/2 x 48 1/2 in unfinished. Measure through the middle in both directions. Correct a significant discrepancy before adding borders.
4. Add the inner cream SIDE borders first: two strips 2 x 48 1/2 in. Mark the midpoint of each strip and center side. Pin ends and midpoint, then ease evenly without stretching. Sew and press toward cream.
5. The top now measures 39 1/2 x 48 1/2 in. Add the inner cream TOP and BOTTOM strips, each 2 x 39 1/2 in. Pin, sew and press.
Checkpoint: 39 1/2 x 51 1/2 in unfinished.
The inner cream frame finishes at 1 1/2 in on every side.
Border rule: use the measured middle dimension, not a stretched outside edge. Keep the top flat on the ironing surface; lift and set the iron rather than dragging it.
Add the pieced square border
Use all 64 print squares. Sew with 1/4-in seams. Each square finishes at 3 in. Press the joins open. Lay the strips around the center before attaching.
Top: B - C - D - E - F - A - B - C - D - E - F - A - B
Bottom: A - B - C - D - E - F - A - B - C - D - E - F - A
Left: C - B - A - F - E - D - C - B - A - F - E - D - C - B - A - F - E - D - C
Right: D - C - B - A - F - E - D - C - B - A - F - E - D - C - B - A - F - E - D
Read top and bottom strips left to right; read side strips top to bottom. This matches the front-view map on page 5.
1. Make top and bottom strips of 13 squares each. Each strip measures 39 1/2 x 3 1/2 in. Sew them to the framed center first; press away from the cream frame.
2. Check: 39 1/2 x 57 1/2 in. Make left and right strips of 19 squares each. Each measures 3 1/2 x 57 1/2 in. Attach these sides, including the corner squares.
Checkpoint: 45 1/2 x 57 1/2 in unfinished.
Do not add separate corner squares: the 19-square side strips already include them.
Finish the outer cream frame
1. Prepare two outer cream SIDE strips, each 2 x 57 1/2 in. Join WOF strips with straight 1/4-in seams as needed, press joins open and cut to measured length.
2. Sew the side strips to the pieced-border top. Match ends and midpoints. Press toward cream. Check: 48 1/2 x 57 1/2 in.
3. Prepare two outer cream TOP and BOTTOM strips, each 2 x 48 1/2 in. Attach, then press. The outer cream frame also finishes at 1 1/2 in.
Completed raw top: 48 1/2 x 60 1/2 in.
The nominal finished design is 48 x 60 in. Binding covers the outside raw edges; it is not an additional pieced border.
Check that the top lies flat and opposite edges match. Remove loose threads and inspect every seam before layering.
Layer, quilt & bind
Backing: From 4 1/4 yd, cut two 68-in lengths. Remove selvages; join the long edges with a 1/2-in seam and press open. Trim to at least 56 x 68 in. This gives about 3 3/4 in extra around the raw top. Increase it if your quilter requires more.
Layer: Lay backing wrong side up, batting above it and quilt top right side up. Smooth without stretching; baste from the center outward. Follow the batting label for permitted quilting spacing.
Quilt: A walking-foot grid or lines beside the rails are simple options. Work with the fabric supported, checking the back for folds. After quilting, square the top and trim backing and batting flush with it.
Prepare binding: Join seven 2 1/2-in x WOF strips with diagonal seams; trim allowances to 1/4 in and press open. Fold lengthwise, wrong sides together. Confirm at least 235 in of usable binding for the roughly 218-in raw perimeter plus handling allowance.
Attach: Start on a straight side with a loose 8-in tail. Match raw edges to the quilt front and sew 1/4 in from the edge. Stop 1/4 in before each corner. Fold the loose strip up at 45 degrees, then down along the next side; sew that side and repeat.
Close: Leave about a 10-in unsewn gap. Lay the tails flat and overlap by exactly 2 1/2 in, the unfolded binding width. Trim to this overlap, unfold and join the ends at right angles with a diagonal seam. Check for twisting and fit before trimming. Refold and finish attaching.
Finish: Fold binding to the back, cover the attachment seam and hand-stitch securely. Form neat corner miters. Remove basting; wash only as permitted by both fabric and batting labels.
Technique reference: Fat Quarter Shop's binding tutorial. This reference explains a technique; it does not endorse this pattern.