Christmas tree star table runner: a step-by-step tutorial (19 × 43 inches)
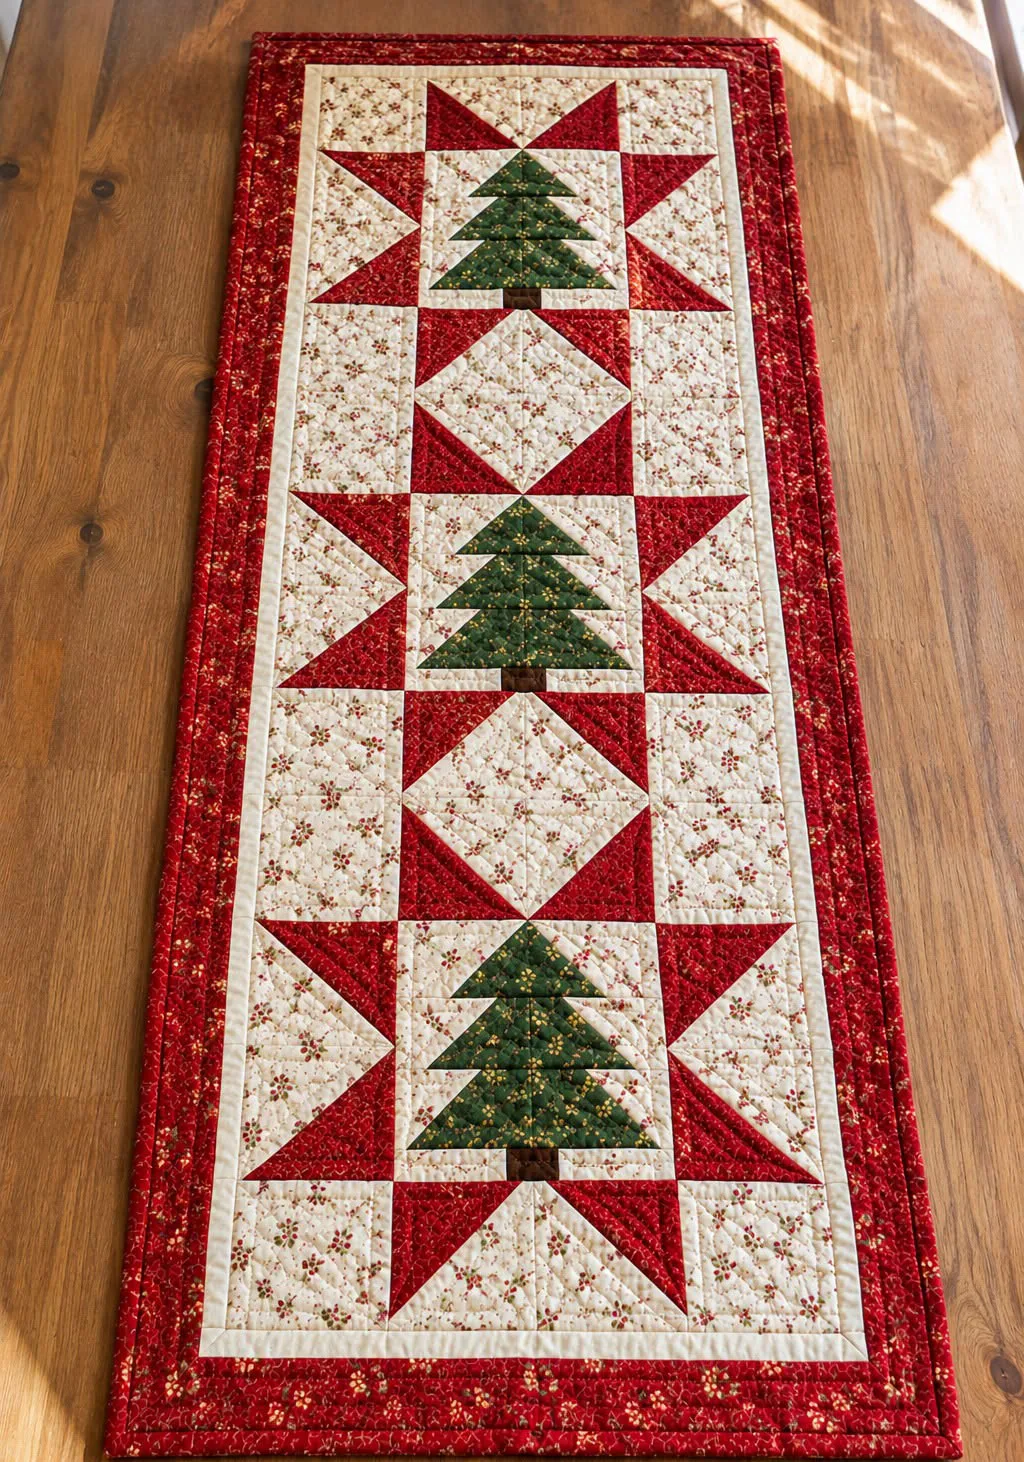
Three sawtooth stars in red and cream, each with a little pieced Christmas tree in the middle. No-waste flying geese, stitch-and-flip tree rows, two borders, full cutting list and a diagram for every step.
Complete guide · No signup required
A runner that says Christmas from across the room
Red stars, soft cream and three little green trees standing in a row: this table runner brings a warm, old-fashioned Christmas feeling to the dining table, the sideboard or the coffee table. Look at it for a moment and you will see that it is really only one block, made three times. Each block is a sawtooth star, and in the middle of each star, where a plain square usually sits, there is a tiny pieced tree.
Where two stars touch, something pretty happens all by itself: the star points meet and form a cream diamond. You do not have to sew anything special for that. It appears when the blocks are joined.
This tutorial goes slowly, one small step at a time. Read each step to the end before you cut or sew, keep a cup of tea nearby, and do not worry if the first tree takes a little while. By the third one you will be making it with a smile.
Words used in this tutorial
Here are the terms you will meet. Come back to this list whenever you need it.
- Sawtooth star: a star block made of a center square, four corner squares and four flying geese.
- Flying goose: a rectangle with one large triangle in the middle and a small triangle at each side. Here the large triangle is cream and the small triangles are red: they become the star points.
- No-waste method: a way of making four geese at once from one large square and four small squares, with no fabric wasted.
- Stitch and flip: a square is sewn on the diagonal across the end of a strip, the extra fabric is trimmed, and the square is pressed open to make a triangle corner.
- WOF (width of fabric): a strip cut from one folded edge of the fabric to the other, about 40 to 42 inches long.
- Seam allowance: always ¼ inch. All cutting sizes in this tutorial include it.
Size and plan
Each star block finishes at 12 inches (12½ inches before it is sewn into the runner). The tree in the middle finishes at 6 inches. Three stars in a column make a 12 × 36-inch center. A narrow cream border (1 inch finished) and a wider red border (2½ inches finished) bring the runner to 19 × 43 inches, a good size for a table that seats four to six.
The tree in the photo has three green tiers and a trunk, and that is exactly what we make here: four short rows, each one 2 inches tall before sewing.
| Part | How many | Size before sewing |
|---|---|---|
| Tree blocks | 3 | 6½ × 6½ in |
| Star-point geese | 12 | 3½ × 6½ in |
| Corner squares | 12 | 3½ × 3½ in |
| Star blocks | 3 | 12½ × 12½ in |
| Inner border | cream | cut 1½ in wide |
| Outer border | red | cut 3 in wide |
| Runner | 1 | 19 × 43 in finished |
Fabric and supplies
Amounts assume fabric about 42 inches wide with at least 40 usable inches, and include a little extra for a crooked cut.
- Cream background (a small print is lovely): ¾ yard
- Red: ⅝ yard (star points and outer border)
- Green: ¼ yard (a fat eighth also works)
- Brown: a scrap at least 2 × 5 inches for the three trunks
- Binding: ⅜ yard (four 2½-inch strips); buy 1 yard of red in total if you want the binding to match the border
- Backing: 1½ yards; batting about 27 × 51 inches
- Rotary cutter, mat, ruler, fabric pencil, thread, pins, iron and sewing machine
Step 1: Cut everything
Cut one fabric at a time and put each group of pieces in its own little pile with a sticky note on top. The table gives the amounts for the whole runner (three stars).
| Fabric | Cut | To get |
|---|---|---|
| Cream | 1 strip 7¼ in × WOF | 3 squares 7¼ in (geese) |
| Cream | 2 strips 3½ in × WOF | 12 squares 3½ in (star corners) |
| Cream | 2 strips 2 in × WOF | 24 squares 2 in, 6 pieces 3 × 2 in, 6 pieces 1¼ × 2 in (tree background) |
| Cream | 3 strips 1½ in × WOF | inner border |
| Red | 2 strips 3⅞ in × WOF | 12 squares 3⅞ in (star points) |
| Red | 3 strips 3 in × WOF | outer border |
| Green | 2 strips 2 in × WOF | for each tree: 1 piece 3½ × 2 in, 1 piece 5 × 2 in, 1 piece 6½ × 2 in |
| Brown | scrap | 3 pieces 1½ × 2 in (trunks) |
Step 2: Make the star-point geese
Each star needs four geese, and the no-waste method makes exactly four at once. For one star, take one 7¼-inch cream square and four 3⅞-inch red squares.
Draw a diagonal line on the wrong side of each red square. Place two red squares on opposite corners of the cream square, right sides together. They overlap a little in the middle, and the drawn line runs from corner to corner of the big square. Sew ¼ inch on each side of the line, then cut on the line.
Press the red triangles open. Each piece now looks like a little heart. Place a red square on the corner of each heart, with the line running from the corner to the point between the two small triangles. Sew ¼ inch on each side of the line, cut on the line and press open. You now have four geese.
- Trim each goose to 3½ × 6½ inches, keeping the tip of the cream triangle ¼ inch below the top edge.
- Repeat with the other two cream squares. You need twelve geese in all.
- Our separate guide to no-waste geese, linked below, shows every stage with its own drawing.
Step 3: Learn the stitch-and-flip corner
The three green tiers of the tree are all made the same way, so practice it once and the rest is easy. Draw a diagonal line on the wrong side of a 2-inch cream square. Lay it on the left end of a green strip, right sides together and edges even. Turn it so the line runs from the bottom-left corner up to the top edge, slanting toward the middle of the strip.
Sew exactly on the line. Trim the extra fabric ¼ inch outside the seam (on the corner side) and press the cream triangle open. Now do the right end the same way, with the line slanting toward the middle from the bottom-right corner.
On the short 3½-inch strip the two cream triangles meet at the top center and make a pointed goose: the top of the tree. On the 5-inch and 6½-inch strips they do not meet, so those tiers have a small flat top, which is exactly what gives the tree its layered look.
Step 4: Make the four tree rows
Now add the side pieces so every row is the same width. Press all these seams toward the green or brown.
- Row 1 (top tier): sew a 2-inch cream square to each end of the little goose.
- Row 2 (middle tier): sew a 1¼ × 2-inch cream piece to each end of the 5-inch tier.
- Row 3 (bottom tier): the 6½-inch tier needs nothing more. It is already full width.
- Row 4 (trunk): sew a 3 × 2-inch cream piece to each side of the brown 1½ × 2-inch trunk.
- Measure: every row should be 6½ inches long and 2 inches tall.
Step 5: Join the rows into a tree
Fold each row in half to find its center and make a tiny crease. Lay row 1 on row 2, right sides together, matching the creases, and pin. Sew, then add row 3 and finally row 4 in the same way. Matching the centers keeps the tree standing straight, with the trunk right under the tip.
Press the long seams open or downward. The tree block should measure 6½ inches square. Make three trees.
Step 6: Lay out a star
On your table, place a tree in the middle with its trunk at the bottom. Put a goose on each side of it, with the cream tip pointing toward the tree. Put a 3½-inch cream square in each of the four corners.
Step back and look: the red triangles should form a star around the tree, with eight points reaching outward. This is the moment to compare with the photo, before anything is sewn.
Step 7: Sew the star block
Sew the pieces of each row together: corner, goose, corner for the top and bottom rows; goose, tree, goose for the middle row. Press the seams of the top and bottom rows toward the corner squares, and the seams of the middle row toward the tree. The seams now face opposite directions and lock together when you join the rows.
Join the three rows, pinning at every seam. When you sew across a goose, keep the needle just a thread’s width above the point of the cream triangle, so the star points stay sharp. The block measures 12½ inches square. Make three stars.
Step 8: Join the stars and add the borders
Stand all three trees up the same way and sew the stars together in a column, pinning where the geese meet. Press the seams open: this keeps the red points flat where they touch. The center of the runner measures 12½ × 36½ inches.
Inner border: cut two cream strips 36½ inches long and sew them to the long sides. Press toward the border. Then cut two strips 14½ inches long and sew them to the short ends.
Outer border: cut two red strips 38½ inches long for the long sides and sew them on. Cut the third red strip in half to get two pieces 19½ inches long for the ends. The runner top now measures 19½ × 43½ inches.
Step 9: Quilt and bind
Lay the backing face down, the batting on top and the runner face up, and baste. Simple straight lines ¼ inch inside each star and along the borders look lovely and are easy to sew. A meander in the cream areas also works well.
For the binding you need about 136 inches: the 124-inch edge plus 12 inches for joins and corners. Four 2½-inch strips are enough.
Fixing common problems
These are the usual surprises with this runner, and how to fix them.
- Star points cut off: the seam crossed the goose too low. Sew just above the point where the seams cross.
- The tree leans: the rows were not matched at the center. Unpick one seam and match the creases again.
- Cream corner does not cover the strip: the stitch-and-flip seam was too far from the corner. Sew a little closer.
- Tree block smaller than 6½ inches: the seams were a bit wide. Trim all three trees to the same size.
- Wavy border: the border was cut to the edge length. Always measure through the middle.
Final thoughts
A runner is the perfect Christmas project: big enough to make your table feel festive, small enough to finish in a few cozy afternoons. Make one for your own home, and maybe a second one as a gift for someone special. Follow Cozy Pattern Lane on Facebook and Instagram (@cozypatternlane) for more easy holiday quilting ideas.