Project overview
- Skill level
- Easy · US terminology
- Finished size
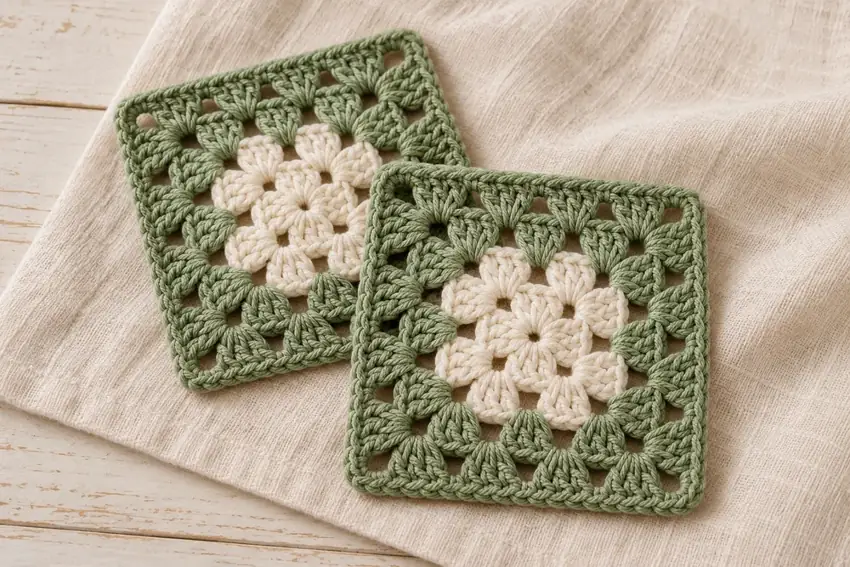
- Target approximately 5 × 5 in (12.7 × 12.7 cm) per finished four-round square. Actual finished size must be checked on a made sample.
- Gauge
- Gauge check: one complete four-round motif, made and cared for as directed, should measure approximately 5 in (12.7 cm) across between opposite straight sides, excluding pointed corner diagonals. Adjust hook or accept a different coaster size.
- Testing status
- Written draft — maker testing pending
Materials & tools
- Smooth category 4 / medium-weight cotton in cream (A) and sage (B). For a pair, set aside about 35 yd (32 m) cream and 65 yd (59 m) sage, plus yarn for any additional swatch. These are planning allowances, not measured consumption.
- A 5 mm crochet hook as a starting point; adjust for the desired motif size and fabric.
- Blunt needle, scissors, four optional corner markers, ruler and the yarn care labels.
Abbreviations & stitch notes
- US terminology throughout.
- ch = chain
- dc = double crochet
- sl st = slip stitch
- group = 3 dc worked into the same space; these are three separate completed stitches, not a bobble
- ch-1 space / ch-2 space = the opening under those chains
- Work joined rounds without turning. The starting ch 3 counts as the first dc; joining and travel slip stitches do not add stitches to the count.
For a refresher, use our chain and single crochet lesson, double crochet lesson, or US / UK terminology referenceCalculate stitches from your gauge →.
Let's make it, step by step.
Read the full pattern once before starting. Optional checkboxes help you follow the sequence for this page view only.
With cream A, chain 4 and slip stitch into the first chain to make a small ring. Work the next round into the ring opening, not individual chains. Leave a tail for weaving.
- 4 groups = 12 dc; 4 ch-2 corners
Chain 3, then work 2 dc into the ring; this is the first 3-dc group. Chain 2. Repeat [3 dc into the ring, chain 2] three times. Slip stitch into the top of the starting chain 3.
- 8 groups = 24 dc; 4 ch-1 side spaces; 4 corners
Slip stitch into the next two double crochets, then slip stitch into the first corner gap. In that gap work [chain 3, 2 dc, chain 2, 3 dc]. Repeat [chain 1, (3 dc, chain 2, 3 dc) into the next corner gap] three times. Chain 1 and slip stitch into the top of the starting chain 3. Fasten off cream.
- 12 groups = 36 dc; 8 ch-1 side spaces; 4 corners
Attach sage B with a slip stitch in any corner gap. Work [chain 3, 2 dc, chain 2, 3 dc] in that gap. Repeat the following three times: [chain 1, 3 dc in the next straight-side chain-1 gap, chain 1, (3 dc, chain 2, 3 dc) in the next corner gap]. Finish the fourth side with chain 1, 3 dc in its straight-side gap, chain 1; slip stitch into the top of the starting chain 3.
- 16 groups = 48 dc; 12 ch-1 side spaces; 4 corners
Slip stitch into the next two double crochets, then into the first corner gap. Work [chain 3, 2 dc, chain 2, 3 dc] in that gap. For each of the next three sides: [chain 1, 3 dc into the next side gap] twice, chain 1, then (3 dc, chain 2, 3 dc) in the next corner. On the fourth side, work [chain 1, 3 dc in the next side gap] twice, chain 1, and join to the top of the starting chain 3.
Fasten off sage. Weave each tail into adjacent stitches in matching color, changing direction without gathering the fabric. Wash and dry following the yarn label. Smooth the square flat and measure across the straight sides; do not stretch it to force the target size.
Repeat the full four-round recipe, keeping cream for rounds 1–2 and sage for rounds 3–4. Compare the two after washing and drying, and record your actual hook, dimensions and yarn use. No fringe or border is added.
Construction, finishing & helpful notes
A small motif with a deliberate color plan
The first two rounds are cream and the outer two rounds are sage. There is no final edging round, fringe or join between separate motifs. Make two matching coasters or repeat the same four-round recipe for a larger set.
The open spaces make these light decorative cup mats rather than solid barriers. Check that the base of your cup is stable on the finished fabric and consider condensation protection for a delicate tabletop. They are not designed to protect a surface from hot cookware.
Four corners control the square
Each corner is (3 dc, ch 2, 3 dc) in one corner space, except round 1, where a single group separates each corner chain space. Chain 1 separates neighboring groups along a straight side; do not put extra chain 1 between the two halves of the same corner.
Chain 3 at the start of a round counts as its first double crochet. A starting group is therefore chain 3 plus two double crochets. Join each completed round with a slip stitch into the top of that chain 3. The joining slip stitch is never counted as a double crochet.
Know the count before the next round
Round 1 has four groups, twelve double crochets and four corner spaces. Round 2 has eight groups, twenty-four double crochets and four straight-side chain-1 spaces. Round 3 has twelve groups, thirty-six double crochets and eight straight-side spaces. Round 4 has sixteen groups, forty-eight double crochets and twelve straight-side spaces. Every round has exactly four corner spaces.
A group means three double crochets in one space, not three stitches joined at their tops. Work into openings below chains, not into individual chain loops. If the square becomes a triangle or a pentagon, find the missing or extra corner before adding another round.
Change colors cleanly and keep the fabric flat
Fasten cream after joining round 2, then attach sage in a corner gap. Starting a new color in a corner avoids dragging yarn across an open side space. Leave tails long enough for several weaving passes through nearby stitches in the same color.
If the square cups, check for omitted chain spaces or tight corner chains. If it waves, first check for extra groups. Correct counts do not guarantee a particular size or flatness in every yarn; reswatch or accept a different relaxed size rather than forcing the corners outward.
Build a useful set
Make every coaster with the same yarn, hook and four-round sequence. Lay them together after care and compare dimensions. A difference in hand tension can change size even when all stitch counts agree, so note which square was made first and use it as a comparison while working.
For a larger square, an additional round follows the same rule: put a full corner in each corner gap and one group in every straight-side chain-1 gap, with chain 1 between neighboring groups. The current design stops at four rounds and changes the color after round 2; a larger version needs more yarn and its own measurement check.
Video help for the techniques
These external tutorials explain stitches or finishing used in this recipe. Follow this page for the project's exact counts, placement and assembly.
How to Crochet a Foundation Chain — Yarnspirations / Red Heart Design Team ↗How to Double Crochet (DC) — Yarnspirations / Red Heart Design Team ↗Weave In Ends in Crochet — Yarnspirations ↗Browse all technique references →Explore the Beyond the Basics collection →
Keep your next make a little easier.
Save yarn, hook, gauge and measurement notes using our free starter checklist.
Open the free checklist ↗