Christmas rose star quilt block: a 12-inch block with no-waste flying geese
🖨️ Prefer to sew from paper? Printable PDF patterns are in our Etsy shop ↗
A big floral rose in the middle, red flying-geese chevrons on every side and spinning pink and green corners. Step-by-step drawings, the four-at-a-time geese trick, a pillow idea and a 52 × 66-inch quilt plan.
Complete guide · No signup required
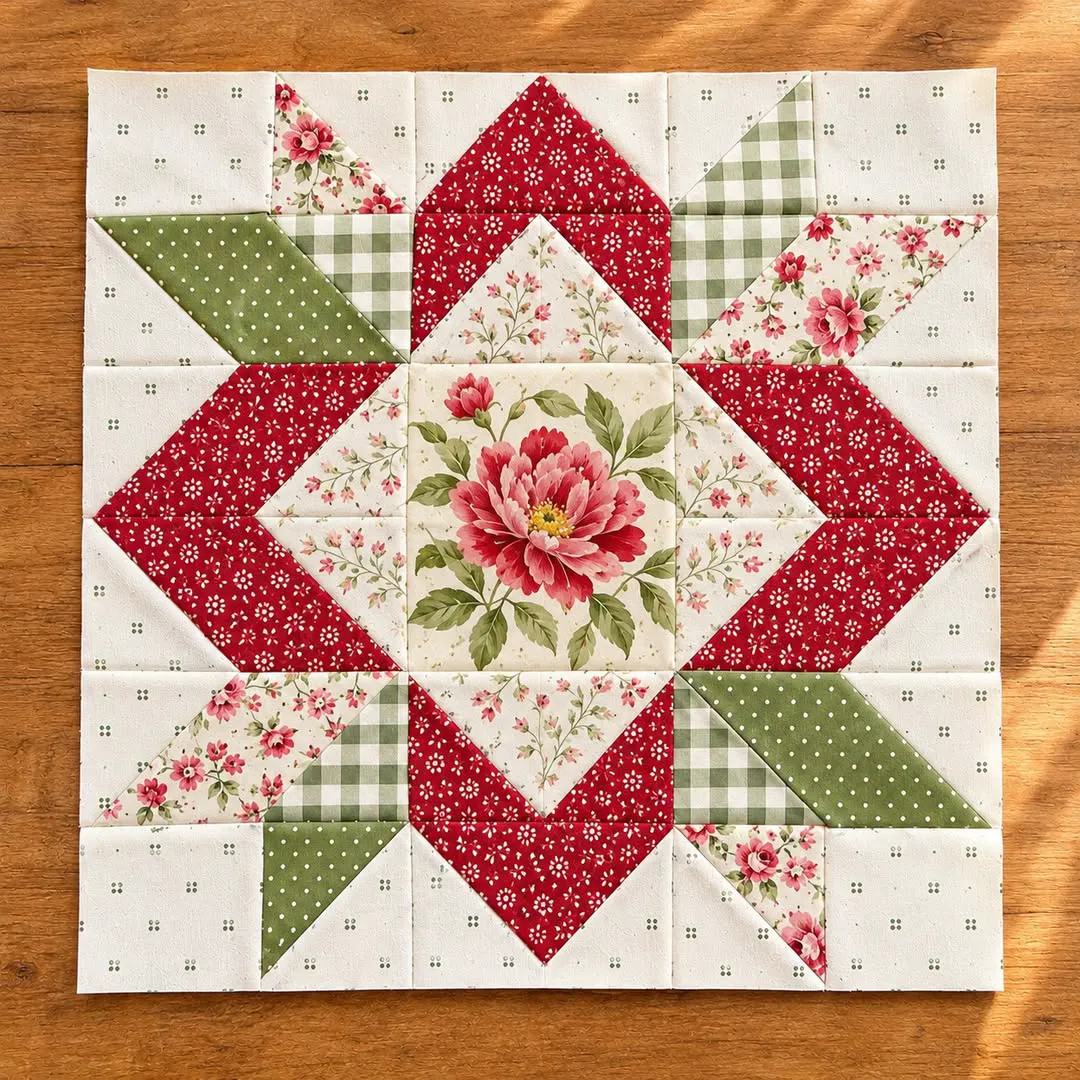
A Christmas star with a rose in the middle
This block puts one favorite large floral right in the center and frames it with red flying geese that form a little chevron on every side. In the corners, pink floral, green dot and green gingham pieces spin around the star like holly leaves. It makes a lovely Christmas pillow on its own, and twelve of them make a cozy lap quilt.
Everything is built on a simple 2-inch grid: one center square, eight flying geese and eight half-square triangles. The geese are made four at a time with the no-waste method, so there are no triangles to cut. The photo shows the look and style of the block; the pattern below is a clean, even version of the design, so your own prints will make it yours.
Block and quilt sizes
The block finishes at 12 inches (12½ inches before sewing it into a quilt). It is made of nine 4-inch units in three rows of three.
| Part | How many | Size before sewing |
|---|---|---|
| Center square | 1 per block | 4½ × 4½ in |
| Flying geese | 8 per block | 4½ × 2½ in |
| Half-square triangles | 8 per block | 2½ × 2½ in |
| Block | 1 | 12½ × 12½ in |
| Pillow (block + border) | 1 | 16 × 16 in finished |
| Quilt (12 blocks) | 1 | 52 × 66 in finished |
Fabric
For one block, scraps are enough: a 5-inch piece of feature floral, a fat eighth of red, a 6-inch piece of light floral, about ¼ yard of cream and small scraps of pink floral, green dot and green gingham.
For the 52 × 66-inch quilt, amounts assume fabric at least 42 inches wide with about 40 usable inches, and include a little extra. Check your own fabric width before cutting.
- Feature floral (centers): ⅓ yard, or ½ yard if you want to center a big flower in every square
- Red (geese, cornerstones, border and binding): 2¼ yards
- Light floral (inner geese): ⅜ yard
- Cream background: 1 yard
- Green dot (corner triangles and sashing): 1⅛ yards
- Pink floral and green gingham: ¼ yard each
- Backing: 4¼ yards, and batting about 60 × 74 inches
Step 1: Cut the pieces for one block
All sizes include the ¼-inch seam allowance. For the quilt, cut twelve of everything.
| Fabric | Cut | Used for |
|---|---|---|
| Feature floral | 1 square 4½ in | Center |
| Red | 1 square 5¼ in + 4 squares 2⅞ in | Red geese (big square) and sky of the floral geese |
| Light floral | 1 square 5¼ in | Floral geese |
| Cream | 8 squares 2⅞ in + 4 squares 2½ in | Sky of the red geese, triangle units, corners |
| Pink floral | 2 squares 2⅞ in | Pink triangle units |
| Green dot | 2 squares 2⅞ in | Green triangle units |
| Green gingham | 4 squares 2½ in | Corners |
Step 2: Make eight flying geese, four at a time
Each set uses one 5¼-inch square for the geese and four 2⅞-inch squares for the sky. Make one set with the red square and four cream squares, and one set with the light floral square and four red squares.
- Draw a diagonal line on the back of the four small squares.
- Place two small squares on opposite corners of the big square, right sides together, with the line running corner to corner. Sew ¼ inch on both sides of the line, cut on the line and press toward the small squares. You now have two heart-shaped units.
- Place one small square on the corner of each heart, with the line pointing to the gap between the two small triangles. Sew ¼ inch on both sides, cut on the line and press.
- Trim each goose to 4½ × 2½ inches, keeping the point ¼ inch below the top edge so it stays sharp after sewing.
Step 3: Make eight half-square triangles
Pair each pink floral and each green dot 2⅞-inch square with a cream 2⅞-inch square, right sides together. Draw a diagonal, sew ¼ inch on both sides, cut on the line and press toward the color.
Check: each unit measures 2½ inches square. You need four pink and four green units.
Step 4: Sew the three kinds of units
Check: every unit measures 4½ inches square.
- Goose pair: sew a red goose on top of a floral goose, both points up, so the red point sits above the floral point. Press toward the red goose. Make 4.
- Corner: lay out a cream square (outer corner), a pink unit and a green unit with the color toward the middle, and a gingham square (inner corner). Sew like a four-patch, pressing the two short seams in opposite directions. Make 4.
- Center: the feature floral square.
Step 5: Lay out and sew the block
Lay the units in three rows of three, with the floral in the middle. Turn the goose pairs so each red point aims away from the center, and turn the corners so each gingham square touches the center diagonally.
- Sew each row of three, pressing toward the goose pairs in the top and bottom rows and toward the center square in the middle row.
- Join the rows, pinning wherever the seams meet, and press the long seams open or toward the middle row.
Step 6: Check the block
The block measures 12½ inches square and finishes at 12 inches. If it is smaller, your seam is a little wide; sew a test seam on scraps and check that it is exactly ¼ inch before making more blocks.
Make it a Christmas pillow
One block makes a 16-inch pillow cover. Add a 2-inch red or green border: cut two strips 2½ × 12½ inches for the sides and two strips 2½ × 16½ inches for the top and bottom. Quilt it lightly and finish with your favorite envelope back for a 16-inch pillow form.
Step 7: Join twelve blocks into a quilt
Cut 31 green dot sashing strips 2½ × 12½ inches and 20 red cornerstones 2½ inches. Lay out the blocks three across and four down first and move them until the colors look happy.
- Sashing row: cornerstone, sashing strip, cornerstone, sashing strip, cornerstone, sashing strip, cornerstone. Make 5.
- Block row: sashing strip, block, sashing strip, block, sashing strip, block, sashing strip. Make 4.
- Press toward the sashing strips, then join the rows, starting and ending with a sashing row. The center measures 44½ × 58½ inches.
- Border: join six red 4½-inch strips. Measure through the middle from top to bottom (about 58½ inches), cut two strips and sew them to the sides. Measure across the middle (about 52½ inches), cut two strips and sew them to the top and bottom. The quilt top finishes at 52 × 66 inches.
Step 8: Quilt and bind
Layer the backing, batting and top, and quilt as you like. Stitching in the ditch around the stars and straight lines through the sashing is easy on a home machine.
For the binding you need about 248 inches: the 236-inch edge plus 12 inches for joins and corners. Seven red 2½-inch strips are enough.
Fixing common problems
Most small problems in this block come from the geese and the seam allowance.
- Goose points cut off: the point must sit ¼ inch below the edge before you sew. Trim with the point centered and ¼ inch from the top.
- Geese too small to trim: your seams were wider than ¼ inch. Try the 5½-inch and 3-inch starting sizes for extra room.
- Corners spin the wrong way: turn the whole corner unit, not the single triangles, so the gingham always touches the center.
- Block smaller than 12½ inches: sew a test seam on scraps and check it is exactly ¼ inch.
- Wavy border: always cut the border to the measurement through the middle, not along the edge.
Final thoughts
Make one block first: it is a perfect weekend project, and it shows you right away whether your geese and seams are on track. Then pick a different rose print for every center if you make the quilt. For more cozy patterns and large-print printable PDFs, visit our Etsy shop, and follow Cozy Pattern Lane on Facebook and Instagram (@cozypatternlane) for a new quilting trick every day.